Knowledge Base
AVM Content
- FRITZ!Box 7590 AX
- FRITZ!Box 7590
- FRITZ!Box 7583 VDSL
- FRITZ!Box 7583
- FRITZ!Box 7582
- FRITZ!Box 7581
- FRITZ!Box 7560
- FRITZ!Box 7530 AX
- FRITZ!Box 7530
- FRITZ!Box 7520
- FRITZ!Box 7510
- FRITZ!Box 7490
- FRITZ!Box 7430
- FRITZ!Box 7390
- FRITZ!Box 7360
- FRITZ!Box 7272
- FRITZ!Box 6890 LTE
- FRITZ!Box 6850 5G
Using a FRITZ!DECT radiator control
Radiator controls, for example FRITZ!DECT 302, are integrated into the FRITZ!Box home network via an encrypted DECT connection (DECT ULE). Then you can use the FRITZ!Box user interface to set up an individual heating program.
Requirements / Restrictions
- A FRITZ!DECT radiator control can only be used with FRITZ!Boxes equipped with DECT base stations and FRITZ!OS 6.83 or later, except for FRITZ!Box 7412.
1 Registering FRITZ!DECT radiator controls
- If you want to register the radiator control with your FRITZ!Box, click "Smart Home" in the FRITZ!Box user interface.
- If you want to register the radiator control with your FRITZ!Smart Gateway, click "Smart Home" in the user interface of your FRITZ!Smart Gateway.
- Click "Devices and Groups" or "Device Management" in the "Smart Home" menu.
- Click the "Register Device" button.
- Within 2 minutes: Push and hold the button "MENU" on the radiator control, then push
 (start registration) and then "OK".
 Important:Push the button next to "OK", not "OK" on the display.
Successful registration is indicated by a checkmark on the display of the radiator control.
2 Installing FRITZ!DECT on the radiator and adjusting it to valve lift
The radiator control must first be mounted on the radiator and then adjusted to the valve lift of the radiator valve:
- Remove the thermostat from the radiator.
- If necessary, mount the appropriate adapter.
- Mount the radiator control.
- Follow the instructions on the display to adjust the radiator control to the valve lift. The valve adjustment is successfully completed as soon as the temperature is shown on the display.
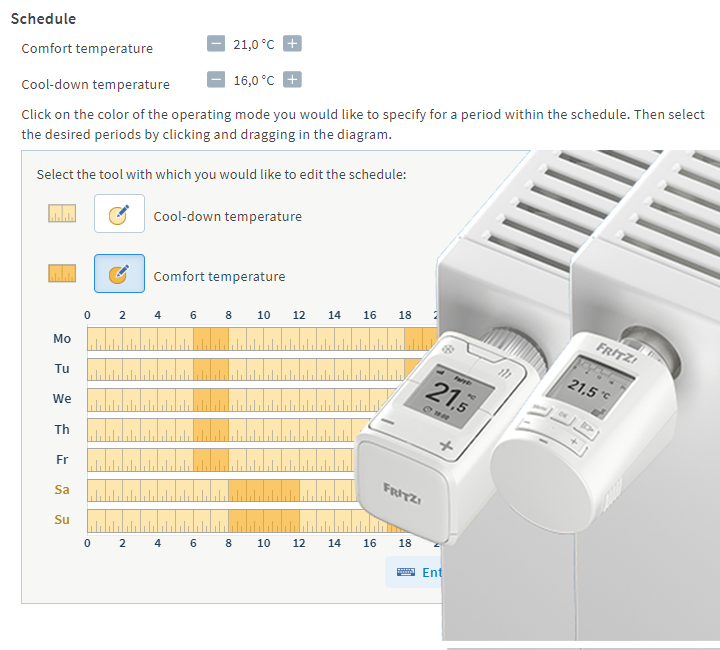
3 Setting up the radiator control
- Click "Smart Home" in the FRITZ!Box user interface.
- Click "Devices and Groups" or "Device Management" in the "Smart Home" menu.
- Click the
 (Edit) button for the respective radiator control.
 - Configure the desired settings.
- Enable the option "Push service enabled" so that you receive an email if the battery is low, the radio connection is lost, or there are errors in the radiator control.
- Click "OK" or "Apply" to save the settings.
To save energy and minimize DECT radiation, radiator controls only communicate with the FRITZ!Box at certain intervals. Therefore, it is possible that the changed settings may not be transmitted to the radiator control until after about three minutes. It takes up to 60 minutes during vacation switching and the phase when the radiator is turned off for them to be transmitted. To transmit the settings immediately, just push any button on the radiator control.
The radiator control is now configured and you can manually control the heater on the device itself, using the FRITZ!Box interface, with FRITZ!DECT 440, with FRITZ!Fon (menu "Home Network > Smart Home"), or in the home network or over the internet with FRITZ!App Smart Home. If you are using a FRITZ!Box with FRITZ!OS 7.50 or later, you can use routines and FRITZ!DECT 350.
 Deutschland
 International (English)
 België (Nederlands)
 Luxemburg (Deutsch)