Knowledge Base
AVM Content
- FRITZ!Box 7690
- FRITZ!Box 7682
- FRITZ!Box 7590 AX
- FRITZ!Box 7590
- FRITZ!Box 7583 VDSL
- FRITZ!Box 7583
- FRITZ!Box 7581
- FRITZ!Box 7530 AX
- FRITZ!Box 7530
- FRITZ!Box 7520
- FRITZ!Box 7510
- FRITZ!Box 7490
- FRITZ!Box 6890 LTE
- FRITZ!Box 6860 5G
- FRITZ!Box 6850 5G
- FRITZ!Box 6850 LTE
- FRITZ!Box 6690 Cable
- FRITZ!Box 6670 Cable
Creating a template and scene for smart home devices

You can save the settings of your smart plugs, for example FRITZ!DECT 200, in templates and scenes and conveniently control your smart home devices together.
Devices of the same type, i.e. smart plug/LED light or radiator control, can be switched individually or together as a group in a template. You can also save convenience features, for example switching Wi-Fi on/off or starting telephone calls, as templates.
Several templates and actions can be combined into a scene. Different device types like FRITZ!DECT radiator controls and smart plugs/LED lights can also be switched together in a scene. You can use predefined scenes or create individual scenes and use them to control your smart home devices easily and conveniently.
Simply enable the template or scene manually, or switch them automatically with a routine.
For example, if you work shifts, you can save different switching profiles in corresponding templates or scenes for early and late shift and then quickly switch between them at any time.
Note:All instructions on configuration and settings given in this guide refer to the latest FRITZ!OS for the FRITZ!Box.
Requirements
- FRITZ!OS 7.50 or later must be installed on the FRITZ!Box to create a scene.
1 Creating and using a template
Creating a template
- Click "Smart Home" in the FRITZ!Box user interface.
- Click "Automation" or "Groups and Templates" in the "Smart Home" menu.
- Click "Creating a Scene or Template" or "Create Template".
- Configure the desired settings and select the devices, the switching type, and the name of the new template.
Note:If a device is already in a group, you cannot assign just that device to a template; you can only assign the entire group to a template.
- Now save the template.
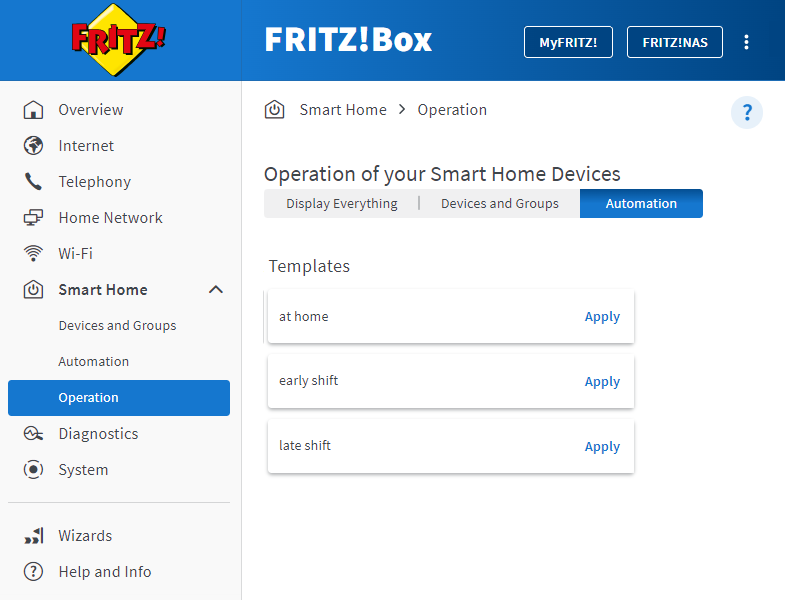
Applying a template
When a template is applied, the current settings of the smart home devices and groups included in the template are overwritten:
- Click "Smart Home" in the FRITZ!Box user interface.
- Click "Operation" in the "Smart Home" menu.
- Click "Applying" for the desired template.
Note:There are several ways to apply the template in the home network and from anywhere over the internet.
2 Creating and using a scene
There are different types of scenes that you can use. With custom scenes, you use templates you created yourself; with predefined scenes, you use automatically generated templates:
Creating a custom scene
- Click "Smart Home" in the FRITZ!Box user interface.
- Click "Automation" in the "Smart Home" menu.
- Click "Create Scene or Template".
- Enable "Predefined or custom scene" and click "Next".
- Enable "Own Scene" and click "Next".
- Enter a name for the scene and click "Next".
- Select the templates you want to combine in the scene and click "Finished". Now the scene is created.
Adjusting a predefined scene
There are two preset scenes, "Coming Home" and "Leaving the House", from automatically generated templates that you can use directly. These preset scenes switch all of the LED lights and smart plugs registered with the FRITZ!Box, Wi-Fi and the Wi-Fi guest network, and the FRITZ!Box answering machine on or off, and set the radiator controls to the comfort or cool-down temperature.
If you would like to adjust a predefined scene, proceed as follows:
- Click "Smart Home" in the FRITZ!Box user interface.
- Click "Automation" in the "Smart Home" menu.
- Click
 (edit) next to the "Leaving the House" or "Coming Home" scene.
 - Enable all of the actions to be included in the scene. Disable the actions which should not be included in the scene.
- Click "Apply" to save the settings.
Applying a scene
- Click "Smart Home" in the FRITZ!Box user interface.
- Click "Operation" in the "Smart Home" menu.
- Click "Applying" for the desired scene.
Note:There are several ways to apply the scene in the home network and from anywhere over the internet.