Knowledge Base
AVM Content
- FRITZ!Box 7590 AX
- FRITZ!Box 7590
- FRITZ!Box 7583 VDSL
- FRITZ!Box 7583
- FRITZ!Box 7582
- FRITZ!Box 7581
- FRITZ!Box 7560
- FRITZ!Box 7530 AX
- FRITZ!Box 7530
- FRITZ!Box 7520
- FRITZ!Box 7510
- FRITZ!Box 7490
- FRITZ!Box 7430
- FRITZ!Box 7390
- FRITZ!Box 7360
- FRITZ!Box 7272
- FRITZ!Box 6890 LTE
- FRITZ!Box 6850 5G
Creating a MyFRITZ! account and setting it up in the FRITZ!Box
MyFRITZ! keeps you informed about the status of your FRITZ! products, available updates and other news on a regular basis, and provides secure access to your FRITZ!Box via the internet. This way you can do the following with your smartphone, tablet or computer from anywhere in the world at any time:
- check the FRITZ!Box's call list and listen to voice messages recorded by the answering machine.
- access FRITZ!NAS to upload and download files, or play multimedia content.
- check the status information and change settings in the FRITZ!Box user interface.
- control smart home devices in the FRITZ!Box home network (for example FRITZ!DECT 200) and check the power consumption of the connected devices.
Your personal data is stored exclusively in the FRITZ!Box at all times and is not transferred to AVM's MyFRITZ! service or to any other service or provider.
To use MyFRITZ!, you only need to create a personal MyFRITZ! account and set it up in your FRITZ!Box. Please take note of the MyFRITZ! terms and conditions of use.
Requirements / Restrictions
- For IPv4 internet access, the FRITZ!Box must obtain a public IPv4 address from the internet service provider.
- For IPv6 internet access, the FRITZ!Box must obtain an IPv6 address from the internet service provider.
Note:All instructions on configuration and settings given in this guide refer to the latest FRITZ!OS for the FRITZ!Box.
1 Configuring MyFRITZ!
- Click "Internet" in the FRITZ!Box user interface.
- Click "MyFRITZ! Account" in the "Internet" menu.
- If the option "MyFRITZ! enabled for this FRITZ!Box" is displayed, enable it and then click the "Another MyFRITZ! account" link to the right of the email address.
- Enable the option "Create a new MyFRITZ! account".
- Enter your email address in the "Email address" field.
- Enter a new password that you have not yet used in the "Enter MyFRITZ! password" field and click "Next".
Note:In the future you will need the MyFRITZ! password to log in to the MyFRITZ! service on myfritz.net. Then myfritz.net redirects you to your FRITZ!Box.
- If you have not set up any users in the FRITZ!Box yet, set up a user for internet access to your FRITZ!Box.
- If you already set up a user for your email address in the FRITZ!Box, this user is automatically selected for internet access to your FRITZ!Box.
- If you set up users without email addresses in the FRITZ!Box, either select an existing user or click the "New user" button and set up a new user for internet access to your FRITZ!Box.
Note:You need the FRITZ!Box user to log in to your FRITZ!Box once you have been redirected to it by myfritz.net. The password for this FRITZ!Box user is not transmitted to the MyFRITZ! service; it is only stored in your FRITZ!Box.
- Click "Next". Now MyFRITZ! sends you an email with the confirmation link to your FRITZ!Box.
- Click "OK" in the "Conclude Registration" window.
- Open the email you received from MyFRITZ!.
Important:If you do not receive an email, the email was classified as unsolicited advertising (spam). In this case, check the spam folder of your email inbox.
- Click the "Confirm MyFRITZ! Registration" button to complete registration.
- Now MyFRITZ! will send you an email confirming that your MyFRITZ! account was successfully created.
Once you have finished setting it up, the FRITZ!Box automatically registers with MyFRITZ! (see fig.) and you can use myfritz.net to access your FRITZ!Box.
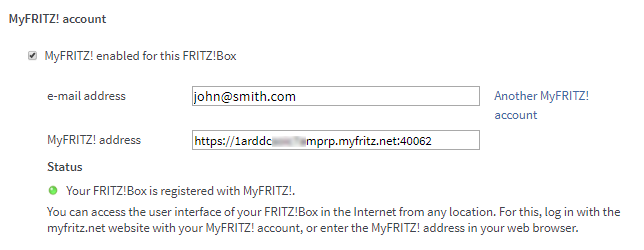
Fig.: MyFRITZ! account in the FRITZ!Box user interface
 Deutschland
 International (English)
 België (Nederlands)
 Luxemburg (Deutsch)