Knowledge Base
AVM Content
- FRITZ!Box 7690
- FRITZ!Box 7590 AX
- FRITZ!Box 7590
- FRITZ!Box 7583 VDSL
- FRITZ!Box 7583
- FRITZ!Box 7582
- FRITZ!Box 7581
- FRITZ!Box 7560
- FRITZ!Box 7530 AX
- FRITZ!Box 7530
- FRITZ!Box 7520
- FRITZ!Box 7510
- FRITZ!Box 7490
- FRITZ!Box 7430
- FRITZ!Box 7390
- FRITZ!Box 7360
- FRITZ!Box 6890 LTE
- FRITZ!Box 6850 5G
- FRITZ!Box 6850 LTE
- FRITZ!Box 6840 LTE
- FRITZ!Box 6690 Cable
Cannot make outgoing calls
You can't make outgoing calls? The telephone does not work or the telephone number is not registered? ✔ Here's what to do.
Outgoing calls cannot be made over the internet with one or more telephones connected to the FRITZ!Box. It is also possible that only certain telephone numbers cannot be called. The problem either occurs sporadically or all the time. When it occurs, the telephone number may not be registered and one of the following error messages or another message regarding the telephone number may be displayed on the "Overview" page or in the event log of the FRITZ!Box:
- "[number] telephone numbers active, none of these registered"
- "Registration of internet telephone number [number] failed. Reason for error: DNS error"
- "Registration of internet telephone number [number] failed. Reason for error: Remote site not responding. Timeout."
- "Registration of internet telephone number [number] failed. Remote site reports reason for error: [40x, 50x, 500, 503]"
- "Internet telephony registration failed [number] Reason for error: [401, 402, 403]"
- "Internet telephony with [Number] failed. Reason for error: [404, 405, 406, 407, 408, 50x]"
- "Internet telephony with [number] via [registrar] failed. Reason for error: Not Acceptable Here (488)"
- "Internet telephony with [number] via [registrar] failed. Reason for error: Timeout: The call was not accepted. [Message]"
- "Internet (telephony) connection cleared."
Simply proceed as described below. After each measure, check whether the problem is solved.
Note:All instructions on configuration and settings given in this guide refer to the latest FRITZ!OS for the FRITZ!Box.
1 Entering your location information
- Click "Telephony" in the FRITZ!Box user interface.
- Click "Telephone Numbers" in the "Telephony" menu.
- Click on the "Line Settings" tab.
- Select your country from the drop-down list under "Location Information". If your country is not listed, select "Other country".
- For the "Country code", enter the leading zeros in the first field and the country code in the second field (for example, enter "00" and "49" for Germany, see fig.).
- For the "Area code", enter the leading zero in the first field and the area code in the second field (for example "0" and "30" for Berlin, see fig.).
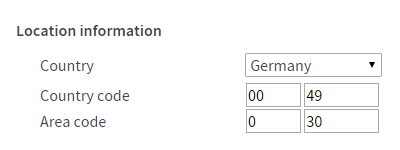
Fig.: Entering the country code and area code (e.g. for Germany and Berlin)
- Click "Apply" to save the settings and on the FRITZ!Box, confirm that the procedure may be executed, if you are asked to do so.
2 Restarting the FRITZ!Box
- Click "System" in the FRITZ!Box user interface.
- Click "Backup" in the "System" menu.
- Click on the "Restart" tab.
- Click the "Restart" button.
3 Enabling calls to international and premium numbers
IP telephones (for example FRITZ!App Fon) and telephones connected to a Mesh Repeater can only be used to make national calls and calls to emergency numbers. You can disable this security feature:
- Click "Telephony" in the FRITZ!Box user interface.
- Click "Telephone Numbers" in the "Telephony" menu.
- Click on the "Line Settings" tab.
- Click on "Change selection" in the section "Security".
- Uncheck the boxes for all of the IP telephones that are allowed to dial international and premium numbers.
- Click "OK" to save the settings and on the FRITZ!Box, confirm that the procedure may be executed, if you are asked to do so.
4 Deleting call blocks
- Click "Telephony" in the FRITZ!Box user interface.
- Click "Call Handling" in the "Telephony" menu.
- Delete call blocks for outgoing calls to individual numbers or ranges of numbers that you want to call.
5 Deleting carrier prefixes (provider prefixes)
- Click "Telephony" in the FRITZ!Box user interface.
- Click "Call Handling" in the "Telephony" menu.
- Click on the "Provider Prefixes" ("Carrier Prefixes") tab.
- Delete all entries under "Global Provider Prefix" ("Global Carrier Prefix") and "Additional Provider Prefixes" ("Additional Carrier Prefixes").
- Click "Apply" to save the settings.
6 Reconfiguring telephone numbers
- Click "Telephony" in the FRITZ!Box user interface.
- Click "Telephone Numbers" in the "Telephony" menu.
- Click the
 (Delete) button for the telephone number.
 - Reconfigure the telephone number and select your internet telephony provider during setup.
- If you are unable to register the telephone number after setup, contact your provider to have them check your telephone number and login information.
7 The provider rejects the call attempt
This section only applies if the message "Internet telephony [...] failed. Reason for error: Not Acceptable Here (488)" is displayed under "System > Event Log" in the FRITZ!Box user interface when the error occurs. This message from your provider means that they do not make a requested function available for your line. This could be caused by the following reasons, for example:
- The provider does not support the requested codec.
- The provider does not support calls to the destination telephone number, for example calls to premium numbers.
- The provider does not allow you to make more than one call at a time.
Therefore, a solution on the part of the FRITZ!Box is not possible.
8 Setting up the FRITZ!Box to conduct calls over another router
- Set up the FRITZ!Box to make telephone calls over the other router.
9 Connecting and configuring an analog telephone
The following steps are only necessary if the telephone is connected to an analog extension (for example "FON 1"):
Setting your analog telephone to tone dialing
- Set your device to "tone dialing" (DTMF) and not "pulse dialing". Pulse dialing is no longer state of the art and can lead to dialing problems on a telephone system. We therefore cannot guarantee that devices with pulse dialing will operate correctly with the FRITZ!Box. With tone dialing, you hear a tone when you press a number key; with pulse dialing, you hear clicking sounds. Refer to the manufacturer of the device for information on how to set it up, for example consult the manual.
Using only one connection option
"FON 1" has two options for connecting devices: You can either use the RJ11 socket on the back or the TAE socket on the side of the FRITZ!Box. You can only use one connection option at a time:
Example:
If you connected a telephone to the RJ11 socket for "FON 1", you cannot connect a device (for example a telephone, answering machine) to the TAE socket.
- If you connected devices to both of the sockets for the same extension, disconnect one of the devices from the FRITZ!Box.
10 Defining telephone numbers for FRITZ!App Fon
- Start FRITZ!App Fon.
- Tap the three-dot menu on the top right and then tap "Settings".
- If you are using FRITZ!App Fon in iOS, tap "Telephone Numbers".
- If you are using FRITZ!App Fon in Android and use the app with several FRITZ!Boxes, first tap the gear icon next to the desired FRITZ!Box.
- Under "Outgoing calls", select the number to be used by FRITZ!App Fon for making calls.
- Under "Incoming Calls", specify which telephone numbers FRITZ!App Fon should react to when you receive calls.
11 Reconfiguring your telephone
- Click "Telephony" in the FRITZ!Box user interface.
- Click "Telephony Devices" in the "Telephony" menu.
- Delete the telephone that you cannot make calls with. To do so, click the corresponding (Delete) button.
- Use the wizard to reconfigure the telephone: To do so, click the "Configure New Device" button and follow the instructions.
Important:Do not use the wizard configure FRITZ!App Fon. FRITZ!App Fon is automatically set up again if you delete the app from your smartphone and reinstall it.
12 Disabling HD telephony
The following steps are only necessary if the problem occurs with a cordless telephone:
- Click "Telephony" in the FRITZ!Box user interface.
- Click "Telephony Devices" in the "Telephony" menu.
- Click the
 (Edit) button for the respective telephone.
 - Click on the "Telephony Device Features" tab.
- Click "Advanced Settings" to display all of the settings.
- Select the option "HD disabled" from the drop-down list in the section "HD Telephony".
- Click "Apply" to save the settings.
The FRITZ!Box is now fully configured for making calls over the internet. If you still have problems, your internet telephony provider may be experiencing technical difficulties.
 Deutschland
 International (English)
 België (Nederlands)
 Luxemburg (Deutsch)