Knowledge Base
AVM Content
Using FRITZ!DECT 350
FRITZ!DECT 350 is a magnetic door/window contact for use in your FRITZ!Box home network. Due to its small size, the sensor can mounted so that it is hidden between the window frame and the sash in many windows with Eurofold. The door/window contact detects immediately when doors or windows are opened, closed, or tilted and for additional security, it signals the status, for instance, open/closed windows, in the FRITZ!App Smart Home, on the FRITZ!Fon, and in the user interface of the FRITZ!Box.
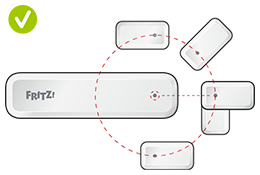
The door/window contact can switch smart plugs and LED lights, for example FRITZ!DECT 200, FRITZ!DECT 500, and regulate the radiator control FRITZ!DECT 302. Additionally, FRITZ!DECT 350 also switches compatible Zigbee devices from other manufacturers. It can also activate templates and scenarios and trigger routines. This makes it extremely easy to realize scenarios such as "If door open, then light on".
Requirements / Restrictions
- FRITZ!DECT 350 can be used as a home network hub with FRITZ!Boxes with DECT base stations and FRITZ!OS 7.50 or later.
- FRITZ!DECT 350 can be mounted in the frame of windows with Eurofold.
- With windows made of aluminum or iron, FRITZ!DECT 350 can only be mounted on the frame, not in the frame, due to its magnetic properties.
1 Registering FRITZ!DECT 350
- Click "Smart Home" in the FRITZ!Box user interface.
- Click "Devices and Groups" in the "Smart Home" menu.
- Click "Register Device".
- Within 2 minutes: Insert the batteries in FRITZ!DECT 350. The LED on the door/window contact flashes, displaying that it is ready to be registered.
- The LED on the sensor glows for 10 seconds as soon as it is successfully registered. Then the door/window contact is displayed in the FRITZ!Box user interface under "Devices and Groups" and can be configured there.
2 Mounting FRITZ!DECT 350
You can mount FRITZ!DECT 350 in the window frame or on the window/door frame. Check to see which is the best place to mount the FRITZ!DECT 350.
ATTENTION!Do not mount FRITZ!DECT 350 on the balustrade as moisture may collect there and damage the sensor.
Use the yellow adhesive strips for test mounting and the white adhesive strips for permanent mounting.
The positioning marks on the sensor and on the magnet must be aligned at certain intervals:
- For the window or door to be recognized as closed, the distance between the positioning marks must not exceed 40 mm.
- For the window or door to be recognized as open, the distance between the positioning marks must be at least 90 mm.
Mounting FRITZ!DECT 350 in the window frame
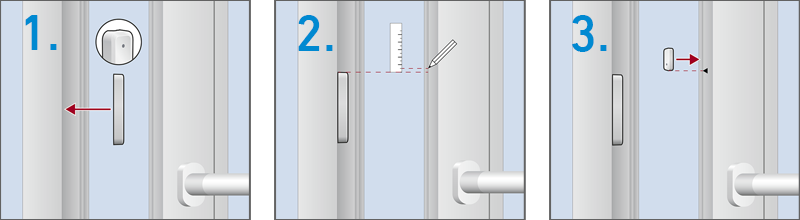
- Open the window completely and attach the sensor in the window frame above the window handle with the positioning mark facing upwards.
- Transfer the position of the sensor to the sash and make a marking for the position of the magnet 2 to 3 millimeters above it.
- Attach the magnet to the marking in the window casement. FRITZ!DECT 350 is mounted and can be configured.
Mounting FRITZ!DECT 350 on the window/door frame
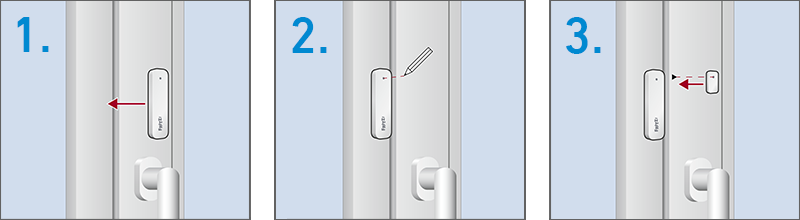
- Close the window or door and attach the sensor to the frame above the window/door handle with the positioning mark facing upwards.
- Transfer the position of the sensor to the window sash/door.
- Attach the magnet to the edge of the housing to the mark. FRITZ!DECT 350 is mounted and can be configured.
3 Configuring FRITZ!DECT 350
You can configure FRITZ!DECT 350 for switching radiator controls, for example FRITZ!DECT 302, for smart plugs, for example FRITZ!DECT 200, and for LED lights FRITZ!DECT 500. FRITZ!DECT 350 can also activate scenarios and templates or be configured as a trigger for a routine:
Configuring for smart plug and LED light
- Click "Smart Home" in the FRITZ!Box user interface.
- Click "Devices and Groups" in the "Smart Home" menu.
- Click the
 (Edit) button for the corresponding door/window contact.
 - In the "Select Action" section, select the option "Switch Smart Home Devices".
- Configure the other desired settings.
- Click "Apply" to save the settings.
Configuring for a radiator control
You can use FRITZ!DECT 350 as an external sensor for your radiator control FRITZ!DECT 302. The radiator control interrupts heating as long as the window is open:
- Click "Smart Home" in the FRITZ!Box user interface.
- Click "Devices and Groups" in the "Smart Home" menu.
- Click the (Edit) button for the radiator control you want to regulate using the door/window contact.
- Select the FRITZ!DECT 350 under "External Window Sensors".
- Click "Apply" to save the settings.
Configuring for a scene and template
You can enable templates and scenes with FRITZ!DECT 350:
- Click "Smart Home" in the FRITZ!Box user interface.
- Click "Devices and Groups" in the "Smart Home" menu.
- Click the (Edit) button for the door/window contact.
- In the "Select Action" section, select the option "Apply Smart Home Templates and Scenes action".
- Configure the other desired settings.
- Click "Apply" to save the settings.
Configuring for a routine
- Create the routine and select FRITZ!DECT 350 as the trigger the routine during configuration.
 Deutschland
 International (English)
 België (Nederlands)
 Luxemburg (Deutsch)