Knowledge Base
AVM Content
- FRITZ!Box 7590 AX
- FRITZ!Box 7590
- FRITZ!Box 7583 VDSL
- FRITZ!Box 7583
- FRITZ!Box 7582
- FRITZ!Box 7560
- FRITZ!Box 7530 AX
- FRITZ!Box 7530
- FRITZ!Box 7520
- FRITZ!Box 7510
- FRITZ!Box 7490
- FRITZ!Box 7430
- FRITZ!Box 7390
- FRITZ!Box 7360
- FRITZ!Box 6890 LTE
- FRITZ!Box 6850 5G
Connecting a printer to a computer using a USB cable and the USB remote connection
With the FRITZ!Box USB remote connection software, you can use your printer connected to the FRITZ!Box as if it were connected directly to the USB port on your computer.
Requirements / Restrictions
- Windows 10 / 8 / 7 (64-bit or 32-bit) is installed on the computer.
Note:All instructions on configuration and settings given in this guide refer to the latest FRITZ!OS for the FRITZ!Box.
1 Connecting a printer to the FRITZ!Box
- Connect the printer to a USB port on the FRITZ!Box.
2 Installing the FRITZ!Box USB remote connection software
Install the FRITZ!Box USB remote connection software on the computer on which you want to use the USB device connected to the FRITZ!Box:
- Log on to the computer as the Windows user who wants to use the FRITZ!Box USB remote connection.
Important:If the user does not have administrator rights, you must enter a valid administrator password when installing or starting the software for the first time.
- Open the FRITZ!Box user interface.
- Click "Home Network" and then "USB Devices".
- Click on the "USB Remote Connection" tab. If the tab is not displayed, enable the Advanced View first.
- Enable the option "USB remote connection enabled".
- Click the "USB remote connection software" link.
- The window "USB Remote Connection" opens.
- If the window "USB Remote Connection" has a "Download" button:
- Click "Download" in the window "USB Remote Connection" and download the file "fritzbox-usb-fernanschluss.application".
- Double-click the downloaded file.
- Click "Install" and follow the instructions on your screen.
- Repeat steps 1 - 8 for all other Windows users who want to use the FRITZ!Box USB remote connection.
3 Enabling the USB remote connection for printers
- Click "Home Network" in the FRITZ!Box user interface.
- Click "USB Devices" in the "Home Network" menu.
- Click on the "USB Remote Connection" tab. If the tab is not displayed, enable the Advanced View first.
- Enable the USB remote connection and the option "Printers (including all-in-one printers)". If you are using an all-in-one printer with scanner, also enable the option "Others (e.g., scanners)".
- Click "Apply" to save the settings.
4 Setting up the printer as a fax / telephone
If it is an all-in-one printer with an integrated fax machine or a telephone, perform the following steps:
- Connect the all-in-one printer to an analog extension on the FRITZ!Box (for example "FON 1").
- Configure the all-in-one printer as a fax machine in the FRITZ!Box. If the printer has an integrated telephone, configure it as a combined telephone/fax machine.
- If the manufacturer of the all-in-one printer provides software or an app for faxing, configure it according to the manufacturer's instructions.
5 Connecting a printer to a computer via the USB remote connection
The FRITZ!Box USB remote connection software offers two different ways of connecting the computer to the printer:
- An automatic connection is automatically established as soon as the computer sends a print job to the printer. After the print job is finished, the connection is automatically cleared and the printer is again available to all of the computers in the home network. The automatic connection is only established for print jobs. Other printer functions cannot be used with this connection type.
- With a permanent connection, all of the functions of the printer (for example ink level indicator, fax or scan function) are available, but access to the printer is blocked for other computers in the home network.
Note:You can combine both options if you use the automatic connection for normal print jobs and only use the permanent connection when you want to use a different printer function.
Enabling automatic connection
- Right-click the FRITZ!Box USB remote connection symbol
 in the notification area of the Windows taskbar (Systray).
 - Enable the option "Connect printer automatically" in the context menu.
- Double-click the FRITZ!Box USB remote connection symbol in the notification area of the Windows taskbar.
- If you log in to your FRITZ!Box with the FRITZ!Box password, enter the password and leave the "Username" field blank.
- If you enter a name and password to log in to the FRITZ!Box, enter the name and password of a user who is authorized to access the FRITZ!Box settings.
Note:You can edit the account information and access rights of users under "System > FRITZ!Box Users" in the user interface.
- If you enter a name and password to log in to the FRITZ!Box, enter the name and password of a user who is authorized to access the FRITZ!Box settings.
- Click the "Refresh" button.
- Right-click on the USB printer that the computer should automatically connect to.
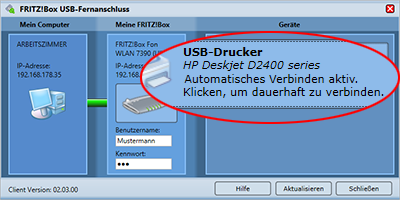
Automatic connection to USB printers enabled - Select "Assign printer..." from the context menu.
- Follow the instructions given in the "Assign printer" window on selecting the appropriate printer driver and then click "OK".
Enabling permanent connection
- Double-click the FRITZ!Box USB remote connection symbol in the notification area of the Windows taskbar (Systray).
- If you log in to your FRITZ!Box with the FRITZ!Box password, enter the password and leave the "Username" field blank.
- If you enter a name and password to log in to the FRITZ!Box, enter the name and password of a user who is authorized to access the FRITZ!Box settings.
Note:You can edit the account information and access rights of users under "System > FRITZ!Box Users" in the user interface.
- If you enter a name and password to log in to the FRITZ!Box, enter the name and password of a user who is authorized to access the FRITZ!Box settings.
- Click the "Refresh" button.
- Right-click on the USB printer that you want to connect to the computer.
Automatic connection to USB printers enabled - Select "Assign printer..." from the context menu.
- Follow the instructions given in the "Assign printer" window on selecting the appropriate printer driver and then click "OK".
- Click on the USB printer to enable the permanent connection.
 Deutschland
 International (English)
 België (Nederlands)
 Luxemburg (Deutsch)