Knowledge Base
AVM Content
- FRITZ!Box 7590 AX
- FRITZ!Box 7590
- FRITZ!Box 7583 VDSL
- FRITZ!Box 7583
- FRITZ!Box 7560
- FRITZ!Box 7530 AX
- FRITZ!Box 7530
- FRITZ!Box 7520
- FRITZ!Box 7510
- FRITZ!Box 7490
- FRITZ!Box 7430
- FRITZ!Box 6890 LTE
- FRITZ!Box 6850 5G
- FRITZ!Box 6850 LTE
Using a FRITZ!DECT smart switch
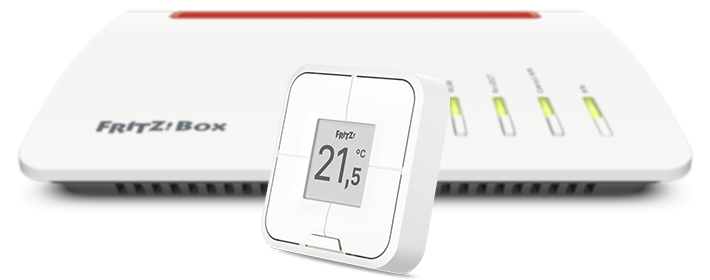
The FRITZ!DECT smart switch is integrated into your home network via an encrypted DECT connection (DECT ULE). With the smart switch you can operate smart plugs, for example FRITZ!DECT 200, radiator controls, for example FRITZ!DECT 302, and also LED lights FRITZ!DECT 500.
You can either switch these smart home devices individually or together as a group, and you can also use the smart switch to activate templates. For example, you can attach the smart switch to an easily accessible location to conveniently operate smart plugs that are difficult to reach. Or you can simply push a button to activate the desired heating profile that you saved as a template.
Note:All instructions on configuration and settings given in this guide refer to the latest FRITZ!OS for the FRITZ!Box.
Requirements / Restrictions
- FRITZ!DECT 440 can be used with a FRITZ!Box with FRITZ!OS 7.50 or later.
1 Registering the FRITZ!DECT smart switch
- If you want to register the smart switch with your FRITZ!Box, click "Smart Home" in the FRITZ!Box user interface.
- If you want to register the smart switch with your FRITZ!Smart Gateway, click "Smart Home" in the user interface of your FRITZ!Smart Gateway.
- Click "Devices and Groups" or "Device Management" in the "Smart Home" menu.
- Click the "Register Device" button.
- Within 2 minutes: Push the menu button. The connection is established and the smart switch is displayed with the connection status "Connected" in the "Smart Home" menu of the FRITZ!Box user interface.
2 Defining general settings for the FRITZ!DECT smart switch
- Click "Smart Home" in the FRITZ!Box user interface.
- Click "Devices and Groups" or "Device Management" in the "Smart Home" menu.
- Select the group of devices from the drop-down list.
- Click the
 (Edit) button for the smart switch.
 - Click on the "General" tab.
- Under "Name", enter a name of your choice for the smart switch.
- Under "Push Service Settings", enable the option "Push service enabled" so that you receive an email if the battery is low, the radio connection is lost, or there are errors.
- Click "Apply" or "OK" to save the settings.
3 Defining what happens when the button is pushed
The standard view "Temperature" is configured for the smart switch. You can also create three additional views. For each view you can set up four switching actions with a single button assignment or two switching actions with a double button assignment. Push the menu button on the smart switch to switch between the views:
- Click "Smart Home" in the FRITZ!Box user interface.
- Click "Devices and Groups" or "Device Management" in the "Smart Home" menu.
- Click the (Edit) button for the smart switch.
- Under "Button Assignments", click the (Edit) button for "View 1".
- Select the group of devices or templates that you want to switch.
- Click the drop-down menu and select the device, group, or template you want to switch.
- Click "Next".
- Select "Convenient switching with two buttons" or "Switch once with one button".
Note:With convenient switching, two buttons are assigned, for example for dimming the LED light FRITZ!DECT 500.
- If you selected "Switch once with one button", select the type of switching and click "Next".
- Enter a name for the button.
- Enter the button position for this switching and click "Next".
The switching for the selected button is saved. - Click "Add Action" and repeat steps 8 - 14 for the other buttons in this view.
Now the button assignments for "View 1" are saved. The button assignment for "View 1" is automatically adopted for the standard view "Temperature". - If you want to set up additional views, click on the next view and repeat steps 5 - 13.
If you use a FRITZ!DECT smart switch to operate radiator controls, the settings are transmitted to the radiator control every 15 minutes or every 60 minutes during vacation switching and the phase when the radiator is turned off. To transmit the settings immediately, just push any button on the radiator control.
 Deutschland
 International (English)
 België (Nederlands)
 Luxemburg (Deutsch)