Knowledge Base
AVM Content
- FRITZ!Box 7590 AX
- FRITZ!Box 7590
- FRITZ!Box 7583 VDSL
- FRITZ!Box 7583
- FRITZ!Box 7582
- FRITZ!Box 7581
- FRITZ!Box 7560
- FRITZ!Box 7530 AX
- FRITZ!Box 7530
- FRITZ!Box 7520
- FRITZ!Box 7510
- FRITZ!Box 7490
- FRITZ!Box 7430
- FRITZ!Box 7390
- FRITZ!Box 7369
- FRITZ!Box 7360
- FRITZ!Box 7330
- FRITZ!Box 7272
- FRITZ!Box 6890 LTE
- FRITZ!Box 6850 5G
- FRITZ!Box 6850 LTE
- FRITZ!Box 6840 LTE
- FRITZ!Box 6820 LTE
- FRITZ!Box 6810 LTE
- FRITZ!Box 6690 Cable
- FRITZ!Box 6670 Cable
- FRITZ!Box 6660 Cable
- FRITZ!Box 6591 Cable
- FRITZ!Box 6590 Cable
- FRITZ!Box 6490 Cable
- FRITZ!Box 6430 Cable
- FRITZ!Box 5590 Fiber
Configuring the push service
You can have the push service send you emails with the connection and usage data of the FRITZ!Box at regular intervals or when certain events occur. Then the FRITZ!Box notifies you that a new FRITZ!OS is available, there are new messages on the answering machine, or that you missed a call, for example. You can also have a backup file with your settings sent to you automatically before each FRITZ!OS update.
Note:All instructions on configuration and settings given in this guide refer to the latest FRITZ!OS for the FRITZ!Box.
1 Entering email account information
- Click "System" in the FRITZ!Box user interface.
- Click "Push Service" in the "System" menu.
- Click on the "Sender" tab.
- Enter your email address and password.
- Click "Account Information: Additional Settings".
Note:In most cases, the FRITZ!Box automatically completes the following information. With smaller local providers, you have to enter it yourself. The required information is supplied by your DSL provider.
- Enter your username and the name of your email provider's SMTP server.
- If the server is not accessible on port 25, enter the port used by the server to communicate, for example 587 (see fig.).
- If the server supports SSL, enable the option "This server supports a secure connection (SSL)".
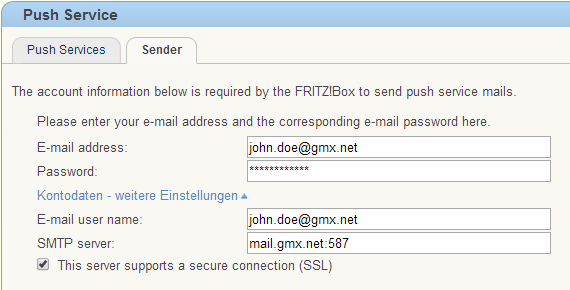
Fig.: Entering account information for push service
- Click "Apply" to save the settings.
- Click "Test Settings" to test whether you entered the account information correctly.
Important:Save the settings first and then click "Testing Push Service" or "Test Settings". Otherwise, the data will not be adopted correctly.
2 Enabling the push service
- Click "System" in the FRITZ!Box user interface.
- Click "Push Service" in the "System" menu.
- Click the
 (Edit) button next to the push services you want to use.
 - Enable the option "Push service enabled" and configure the individual push services. If you want to have the push service mail sent to several email addresses, separate the email addresses by commas and do not add spaces between them.
- Click "OK" to save the settings.
 Deutschland
 International (English)
 België (Nederlands)
 Luxemburg (Deutsch)