Knowledge Base
AVM Content
- FRITZ!Box 7590 AX
- FRITZ!Box 7590
- FRITZ!Box 7583 VDSL
- FRITZ!Box 7583
- FRITZ!Box 7582
- FRITZ!Box 7581
- FRITZ!Box 7560
- FRITZ!Box 7530 AX
- FRITZ!Box 7530
- FRITZ!Box 7520
- FRITZ!Box 7510
- FRITZ!Box 7490
- FRITZ!Box 7430
- FRITZ!Box 7390
- FRITZ!Box 7369
- FRITZ!Box 7360
- FRITZ!Box 7340
- FRITZ!Box 7330
- FRITZ!Box 7272
The FRITZ!Box's Power LED flashes
The FRITZ!Box's Power LED flashes? ✔ Here you can find out what this means and how to solve the problem.
Your FRITZ!Box establishes a connection to the mobile network as soon as you insert your SIM card and enter the PIN in the FRITZ!Box user interface. This can take up to 2 minutes. During this time, the Power LED on the FRITZ!Box flashes and then stays lit as soon as the connection has been established.
This guide shows you how to resolve the following error:
- The FRITZ!Box's Power LED flashes continuously and you cannot connect to the internet.
One or several of the following error messages may be displayed in the event log of the FRITZ!Box:
- "No LTE network was found within range."
- "Could not establish LTE connection.
Reason: EPS_SERVICES_NOT_ALLOWED_IN_THIS_PLMN"
Simply proceed as described below. After each measure, check whether the problem is solved.
Note:All instructions on configuration and settings given in this guide refer to the FRITZ!Box 6820 LTE v2 and v3 with the latest FRITZ!OS, the FRITZ!Box 6820 LTE v1 may vary.
1 Issue occurred after updating FRITZ!OS
Only follow the instructions in the following guide if the error occurred immediately after a FRITZ!OS update:
2 Checking the event log of the FRITZ!Box
- Click "System" in the FRITZ!Box user interface.
- Click "Event Log" in the "System" menu.
- Select "Internet Connection" from the drop-down list.
- If the FRITZ!Box indicates that the mobile network connection is established temporarily and drops repeatedly, follow the steps in our guide FRITZ!Box reports that the mobile network connection drops frequently.
3 Checking your SIM card
Although it may not appear to be the case, your SIM card may have been inserted incorrectly, it may be damaged, or it may be the incorrect SIM card. Therefore, check the SIM card in the FRITZ!Box:
- Press the SIM card briefly to remove it from the SIM card slot.
- Check whether it is the mini-SIM (25 x 15 x 0.76 mm) SIM card you received from your mobile network provider and that the contacts are not damaged.
Important:Do not use any micro or nano-SIM cards that have already been punched out and inserted into a SIM card tray because they can get jammed and damage the SIM slot.
-
- If it is not the mini-SIM card you received from your mobile network provider or the contacts on the SIM card are damaged, contact your provider.
- If it is the mini-SIM card you received from your mobile network provider and the contacts on it are not damaged:
- Pick up the FRITZ!Box so that you are facing the underside of the device and can read the "SIM Card" label on the SIM card slot.
- Insert the SIM card into the SIM card slot with the slanted edge of the card on the left and the contacts facing downwards.
- Push the SIM card gently into the SIM card slot until it clicks into place. A few millimeters of the SIM card protrude from the SIM card slot.
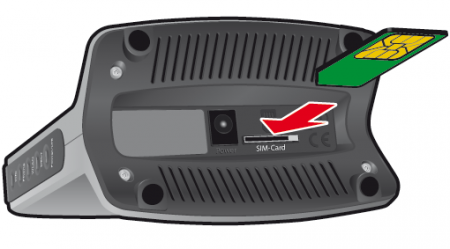
Inserting the SIM card
4 Configuring the FRITZ!Box
Enabling roaming
The following step is only necessary if you are not using the FRITZ!Box in Germany and your mobile network provider is using a different provider's network at your location:
- Click "Internet" in the FRITZ!Box user interface.
- Click "Account Information" in the "Internet" menu.
- Enable the option "Permit roaming".
ATTENTION!Enabling roaming could result in additional costs. Refer to your mobile network provider for information on roaming and possible costs.
- Click "Apply" to save the settings.
Selecting the frequency band
Depending on your mobile network provider, at individual locations you may need to select the frequency band in the FRITZ!Box manually:
Note:In Germany, the frequency bands 2.6 GHz, 1.8 GHz, and 800 MHz are used. Not all frequency bands are available at all locations, and not all mobile network providers support all frequency bands.
- Click "Internet" in the FRITZ!Box user interface.
- Click "Account Information" in the "Internet" menu.
- In the "LTE Frequency Band" section, enable the option "Manual" and disable all frequency bands except "2.6 GHz / band 7".
- Click "Apply" to save the settings.
- If the FRITZ!Box can establish a mobile network connection using the frequency band you selected:
- Click "Internet" and then "LTE Information".
- Click on the "Mobile" tab.
- Check which speed is displayed in the "Throughput" line.
- Repeat steps 2 - 5 with the frequency bands "1.8 GHz / band 3" and "800 MHz / band 20", and use the frequency band the FRITZ!Box can achieve the highest throughput with.
5 Installing the latest FRITZ!OS for the FRITZ!Box
Installing the latest FRITZ!OS makes your FRITZ!Box compatible with the latest mobile network technology used by mobile network providers in their radio cells:
6 Finding the ideal location for the FRITZ!Box
You can use the alignment aid to find the ideal location for the FRITZ!Box and the best position for the mobile network antennas:
- Click "Internet" in the FRITZ!Box user interface.
- Click "LTE Information" in the "Internet" menu.
- Click on the "Reception" tab.
- Click the "Start Alignment Aid" button.
- Now the current signal strength of the antennas is displayed by the LEDs on the FRITZ!Box (in five levels) and in the user interface.
- Select a location for the FRITZ!Box where the signal strength is as high as possible. When doing so, note the following:
- Do not set up the FRITZ!Box in the corner of a room.
- Place the FRITZ!Box as close to an outside wall as possible. If you know where your provider's mobile radio cell is located, place the FRITZ!Box by the wall facing the mobile radio cell.
Important:If you place the FRITZ!Box in the attic or on a window sill, make sure that the permissible operating temperature of 0° to 40° Celsius is not exceeded.
- Position the FRITZ!Box so that it is as unobstructed as possible, i.e. not directly in back of or under an obstacle such as pieces of furniture or a heater.
 Deutschland
 International (English)
 België (Nederlands)
 Luxemburg (Deutsch)